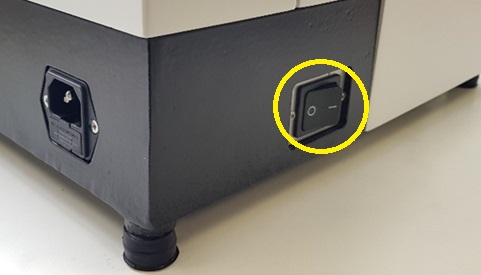
Turn on using the switch located on the left-hand side at the rear (see image below).
 The Startup Screen will appear on the touch screen; the Stage and Advance will move to the loading position (see below).
 Once the stage and advance are fully retracted, the Startup Screen (see below) is only displayed when the instrument is switched on. Thereafter the Slice Screen and Menu Screen is used to access CUSTOM and PREPARATION.
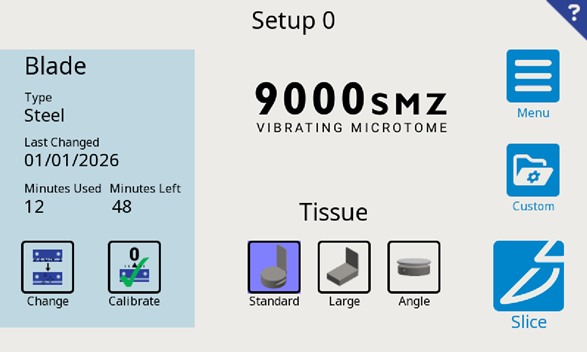 From here Select either:
 SLICE: Choose this option to quickly start slicing without changing the Custom Setup, Blade or Tissue Mount. Note: A tissue bath must be fitted to continue. This option takes the user to the Move Screen (see
section 13).
SLICE: Choose this option to quickly start slicing without changing the Custom Setup, Blade or Tissue Mount. Note: A tissue bath must be fitted to continue. This option takes the user to the Move Screen (see
section 13).
 CUSTOM: Change to a different Custom Setup.
The Custom Setup holds user set slice parameters such as blade frequency and amplitude. See
section 15 for a more detailed explanation.
CUSTOM: Change to a different Custom Setup.
The Custom Setup holds user set slice parameters such as blade frequency and amplitude. See
section 15 for a more detailed explanation. PREPARATION: Change the blade, calibrate the z-axis alignment or select a different Tissue Mount.
Slice or Custom can also be accessed from this screen (see section 10).
PREPARATION: Change the blade, calibrate the z-axis alignment or select a different Tissue Mount.
Slice or Custom can also be accessed from this screen (see section 10).
 |
If this is the first time using this instrument, you will need to calibrate the blade, select the blade type and choose the tissue mount. Select PREPARATION out of the three options. CUSTOM will be irrelevant for now as the 9000SMZ has factory defaults set. |