 ">
">
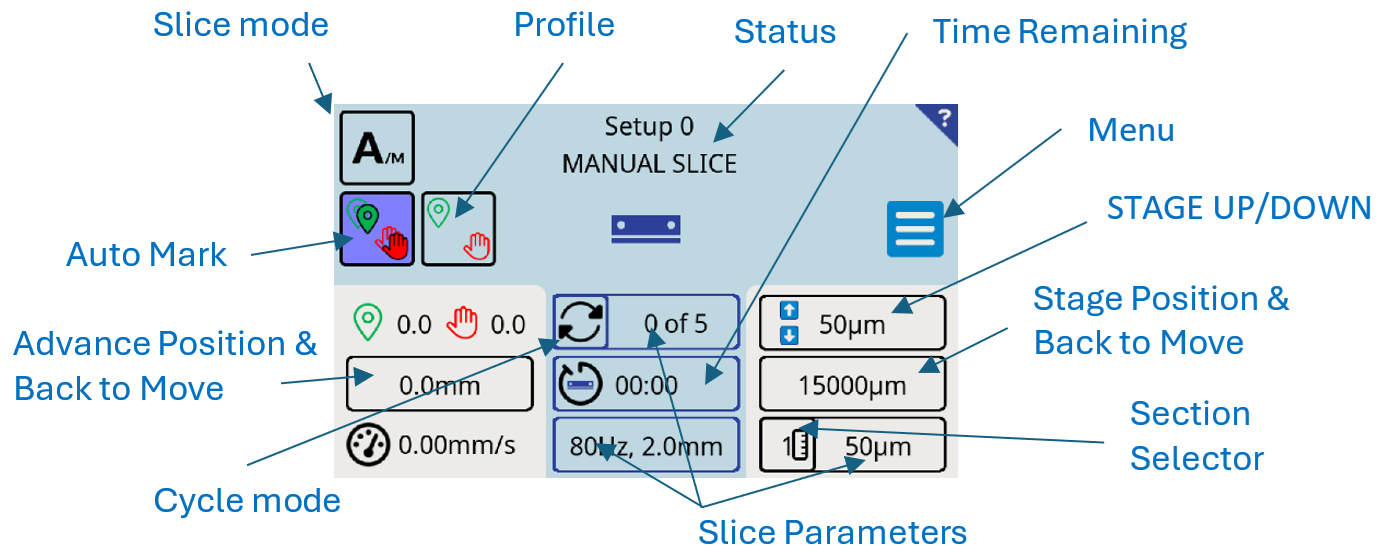
Slice parameters are all displayed on the slice screen and can be updated by pressing the desired parameter button (Cycles, Slice Parameters and Section)
or  from the menu. This will open the Slice Parameters Screen. Slice parameters can be stored as part of the Custom Setup as described in
Section 15, or by holding
the
from the menu. This will open the Slice Parameters Screen. Slice parameters can be stored as part of the Custom Setup as described in
Section 15, or by holding
the  Slice
button on exit.
Slice
button on exit.
Section
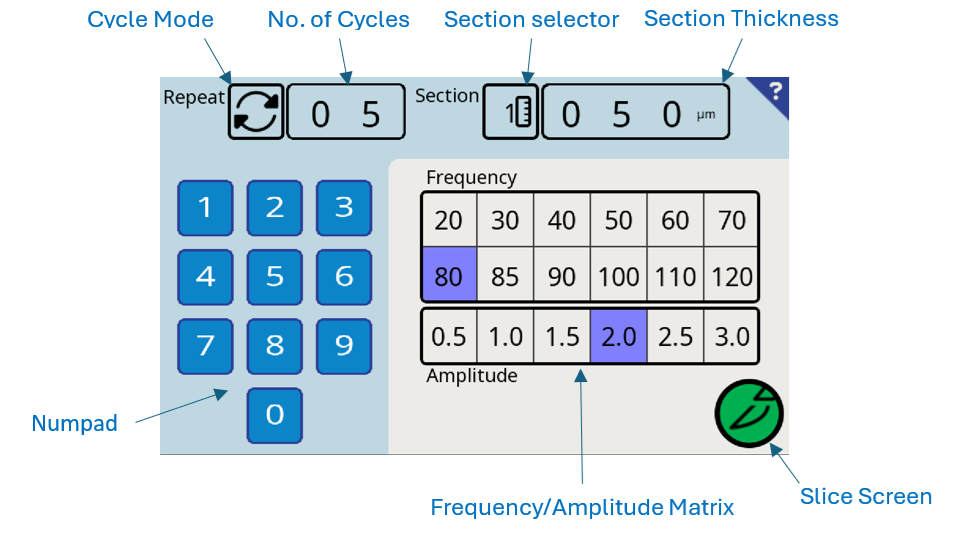
The  Section selection button, allows the sequential selection of three section thicknesses (denoted by the number 1-3
adjacent to the ruler symbol); each slice thickness option may be edited within a range of 001µm to 999µm using the number pad. See
Section
14.5.
Section selection button, allows the sequential selection of three section thicknesses (denoted by the number 1-3
adjacent to the ruler symbol); each slice thickness option may be edited within a range of 001µm to 999µm using the number pad. See
Section
14.5.
Cycles
See
Section 14.6
Frequency/Amplitude Matrix
Within the Parameters Screen
selecting the desired frequency will highlight the available amplitudes in cyan.
Alternatively selecting the desired amplitude first will highlight the available
frequencies in light blue. The selected frequency and amplitude will be
highlighted in violet.
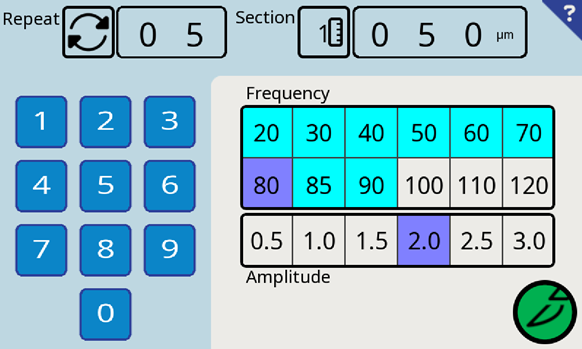 Note: for the higher frequencies, only the lower amplitudes are possible, see the table below.
 Select the Slice button to return to the Slice Screen.
14.2 First Pass
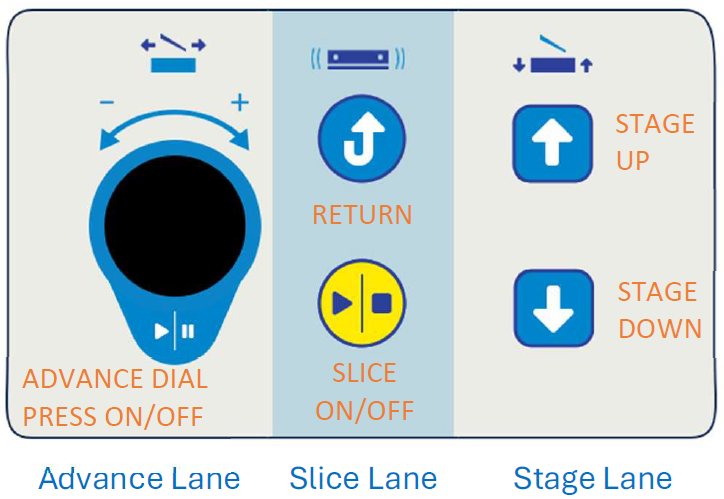
Fine tuning of the blade position relative to the mounted tissue specimen may be achieved prior to taking a slice by operating the Blade Advance Rotary Dial. The stage height can be adjusted using the up and down buttons on the keypad. This will move the stage respectively and the Stage position will be updated on the screen. Pressing the  Step move button will change the adjustment value.
Note: For the first pass, the section value will not be affected by this adjustment.
Step move button will change the adjustment value.
Note: For the first pass, the section value will not be affected by this adjustment.
14.3 Return to start
Selecting the  return button after a slice, the blade advance will retract to the selected Start position. As part of the return move, the stage is retracted slightly to avoid rubbing across the specimen. When the Start position is reached the stage will be incremented by the selected specimen thickness, ready for the next slice.
14.4 Slice Mode
Two Slice Window modes are available and can be selected by toggling the Slice Window mode button between  Automatic slice window/profile and
  Manual slice window. Automatic is the default setting, though this may be changed as part of the Custom Setup (see
Section 15). The following list shows how the different slice modes operate:
Manual slice window. Automatic is the default setting, though this may be changed as part of the Custom Setup (see
Section 15). The following list shows how the different slice modes operate:
-
Automatic Window Procedure
 Auto-Mark Button
If the Auto-Mark button is selected the most recent slice image will be
recorded after the slice has been taken and the return button pressed. If
the button is not enabled , any previously stored image will be available.
the most recent slice image will be
recorded after the slice has been taken and the return button pressed. If
the button is not enabled , any previously stored image will be available.


 Auto-Window/Profile Button
The Auto-Window /Profile button toggles between three modes, Manual Slice , Window Slice
and Profile Slice . Window Slice and Profile Slice are only available once an image has been recorded, usually by taking the first slice.
+ Automatic Mark and Recording an Image (Default)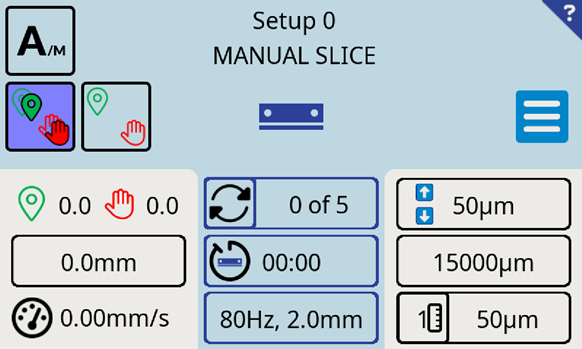
When first entering the slice screen, this mode is set by default. Automatic Slice Mode facilitates the “Auto-marking” of Start and Finish points by recording them during an active slice.
Press the Slice button on the keypad. As the slice is being taken, the user has full control of the blade advance speed and the ability to pause the Advance via the Rotary Dial.
During the slice, the advance can be paused (pressing the Rotary Dial) or the blade can be stopped and re-started by pressing the Slice Key.
When the blade has advanced through the tissue, press the Slice
Key to stop the slice.
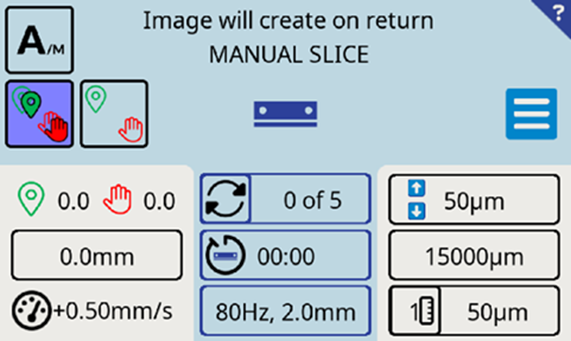
The touchscreen will prompt “Image will create on return”. If the image is not required, press theAuto-Mark button to de-select , the touchscreen will then prompt “Set mark to create image on return”.
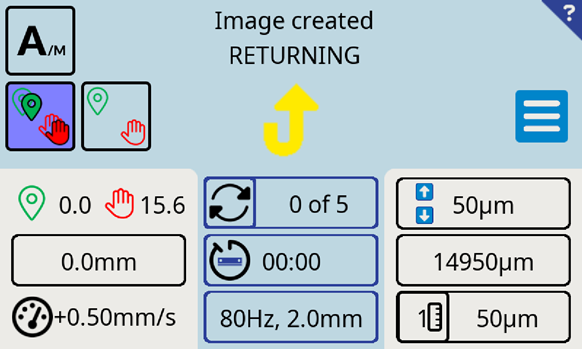
Pressing the Return Key will move the Blade, Advance and Stage position to the start point of the next slice. When the
Return Key is pressed the image either be kept or discarded, depending on the status of the Auto-Mark Button.
 If the
Auto-Mark button is selected to create an “image”, the recorded “image” will be stored from this slice and be available for subsequent slices. Note: The “image” of the slice contains the slice’s
If the
Auto-Mark button is selected to create an “image”, the recorded “image” will be stored from this slice and be available for subsequent slices. Note: The “image” of the slice contains the slice’s
 Start and
 Finish points, plus the variations in the Advance speed (Profile) made by the user during the slice.
 +
+
Automatic Window Slice
+
+
Automatic Window Slice
This mode uses the Start and
Finish points of the most recently stored image. An image must be available. The advance speed between these points is controlled by the user.
Select the profile button until the "window" icon†appears in blue.
Note: Ensure that Auto-Mark button is deselected if you do not wish to overwrite the slice image.
If required, select the desired Cycle option, refer to
Section 14.6.
Cycle option, refer to
Section 14.6.
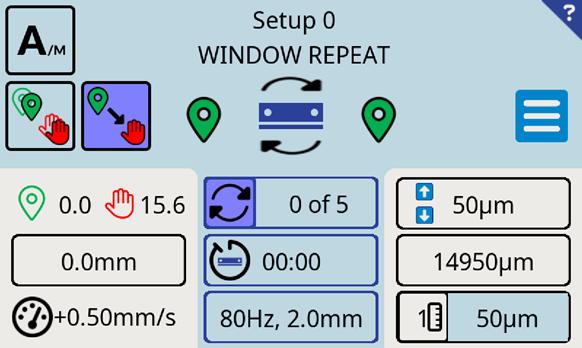
This image shows an Auto Window slice with the Cycles option selected.
Press the Slice
Key.
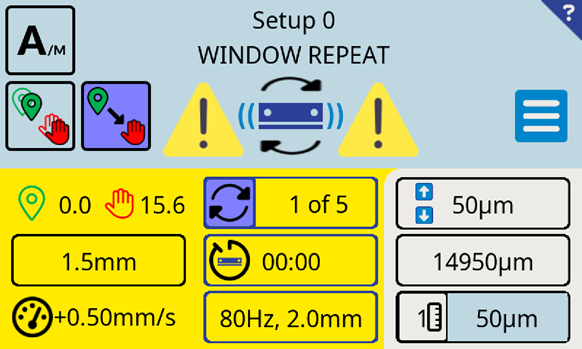 This image shows an Auto Window slice with the Cycles option selected. The Blade & Advance are active.
Adjust Advance speed as desired during slicing via the Rotary Dial.
Subsequent slices may be taken until the Limit of Stage travel has been reached.
+
+ Automatic Profile Slice Procedure
From the most recently stored image, Start,
Finish points and the Advance speed profile across the slice may be used for subsequent slices.
Toggle the Window/Profile button until the
Profile button is display.
When the slicing is "active" the user can pause the Advance by momentarily pushing on the Rotary Dial, but will be unable to adjust the Advance speed. To return to manual control during a slice, toggle the window/profile button to deselect. The speed
Advance speed is now controlled by the
Rotary Dial.
Select the Profile (window/profile) button (this will highlight in blue).
Note: Ensure that Auto-Mark button is deselected if you do not wish to overwrite the
slice image.
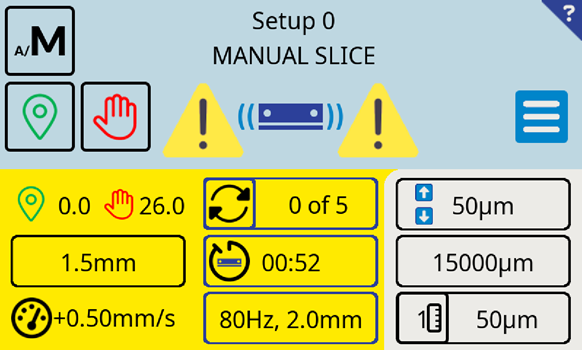
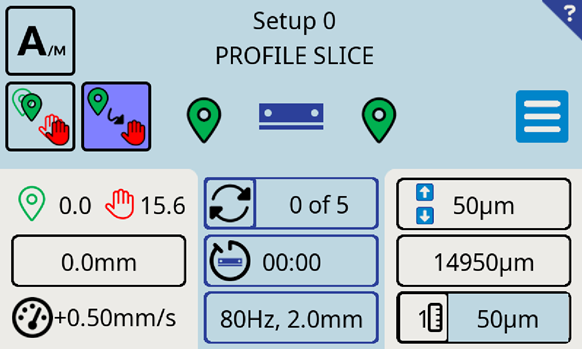 This image shows an Auto Profile slice with the Cycles option de-selected.
Press the Slice button on the keypad.
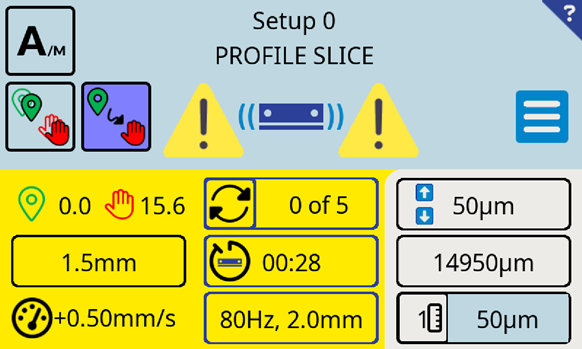 This image shows an Auto Profile slice with the Cycles option de-selected. The Blade and Advance are active.
Repeat slices may be taken until the Limit of Stage travel has been reached. -
Manual Slice Procedure
In this mode it allows you to setStart and
finish limits manually when a slice is taken.
Before slicing, a Start limit can be created by pressing and holding the
 Start limit button. Momentary pressing this button toggles the set limit on and off (ON =
 ).
).
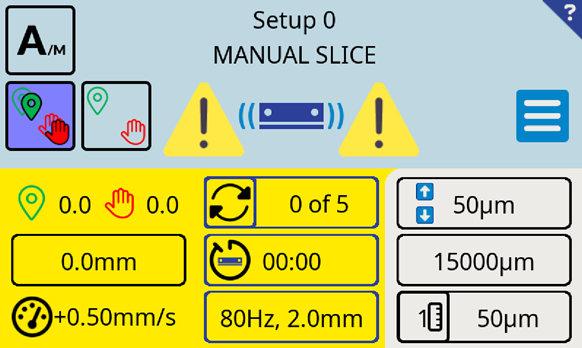
Press the slice button on the keypad to take a slice.
 When the slice has been taken it is possible to mark a
Finish point by pressing and holding the
When the slice has been taken it is possible to mark a
Finish point by pressing and holding the
 Finish button. Momentary pressing this button toggles the set limit on and off (ON =
 ).
).
Press the Return button on the Keypad to return to the Start Limit. If a limit is not set, then the blade will return to the blade advance home position.
If the Finish limit has been set, subsequent slices will be Windowed. It is possible to select a cycle mode (see
section 14.6). The home position will be used as the start limit if none is set/selected.
Repeat slices may be taken until the Limit of Stage travel has been reached.
There are three preset Section thickness available, they are selected by pressing the
section selector button. The preset values can be set in the Slice Parameters Screen (see
section 14.1).
The section thickness will automatically be added to the stage travel after a
Return operation. Making changes after this will automatically readjust the stage height to suit.
There are three ways to make a quick change (Note: this is not possible on the first pass). If the pre-set value is not used, changing the value will move the section selection to #.
- Using the keypad
 up/
up/
 down buttons will adjust the Section thickness in steps by the value indicated in
Step Move. Pressing the
Step move button will change the adjustment value.
down buttons will adjust the Section thickness in steps by the value indicated in
Step Move. Pressing the
Step move button will change the adjustment value. - Press Section to enter the Slice Parameters Screen. In the Section display, make sure # is selected ( toggle through). Enter the desired section thickness. Pre-set values can also be edited here and saved to the Custom Setup (see
section 15).
- Press Stage position to enter the Move screen. Adjust the section thickness as required.
14.6 Repeat Cycles, Stop at Start and Stop at Finish.
It is possible to enable a fully automatic repeat slice operation, a Stop at start operation and a Stop at Finish operation. They are available for both Automatic and Manual slice modes.
+
/
+
Window or
+
Profile repeat must have been selected to enable these modes.
Mode selection
The selected mode is indicated on the
Cycle mode button. Pressing this button will enable the function
 . To change the mode, Press the large cycles display to enter the Slice Parameters screen (see
section 14.1). Toggle the Cycles icon here to select the mode and enter the number of cycles for the repeat function using the numpad. These parameters can be saved to the Custom Setup (see
section 15).
. To change the mode, Press the large cycles display to enter the Slice Parameters screen (see
section 14.1). Toggle the Cycles icon here to select the mode and enter the number of cycles for the repeat function using the numpad. These parameters can be saved to the Custom Setup (see
section 15).
Repeat Cycles
With this mode enabled the slicer will continually repeat the windowed or profile slice operation for the number of cycles indicated.
 Stop at Start
With this mode enabled, on pressing the slice button the instrument will take either a window slice or a Profile slice. At the finish point, the slice will automatically return to Start ready for the next slice operation.
 Stop at finish
With this mode enabled, on pressing the slice button the instrument will take either a window slice or a Profile slice. At the finish point, the slice will stop. Pressing slice at this point, the instrument will Return to the Start point and begin taking the next slice. Pressing Return when at the finish point will make a return move only.